Nice tool to convert C# to VB.Net code. I guess most of the VBA programmers will require this tool to develop VSTO solutions as most of the code points towards C# solutions.
Convert C# to VB.Net
Wednesday, April 8, 2009
Tuesday, March 31, 2009
Deploying VSTO 3.0 Solution for the 2007 Microsoft Office System Using Windows Installer for All Users
Hi,
It's been quite a while I am thinking about writing a blog on "VSTO 3.0 Deployment". I faced some serious problems in my inital stages of VSTO deployment as there was no clear path to all users deployment. I have to chase more than 3-4 articles/blogs to understand the concept of deploying the solution for all users. So, I thought of providing the deployment solution for all users in one single article which might be helpful for starters.
What we are going to see in this section?
1. Create a WordAddin
2. Create Setup Project
3. Configuring prerequisites
4. Configuring Registry Keys
5. Trusting solution for All Users
1. Create a WordAddin:
Open Microsoft Visual Studio 2008.
On the File menu, expand New and click Project to create a new Visual Studio project.
In the New Project dialog box, in the Project types pane, expand Visual Basic, expand Office, and then select 2007.
In the Templates pane, select Word 2007 Add-in.
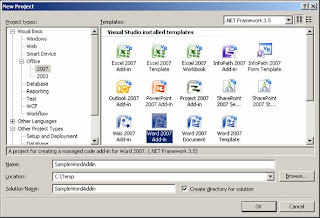
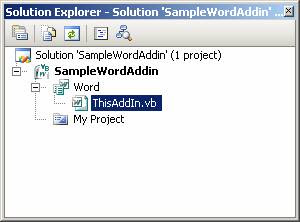
Select Create Directory for Solution, and click OK to create the new Word 2007 add-in. The Solution Explorer displays the opened solution.
In the code editor, locate the ThisAddIn_StartUp method. Add a call to the System.Windows.Forms.MessageBox.Show method to display a custom message when the add-in starts.
Public Class ThisAddIn
Private Sub ThisAddIn_Startup(ByVal sender As Object, ByVal e As System.EventArgs) Handles Me.Startup
System.Windows.Forms.MessageBox.Show("Sample Word Addin Launched ")
End Sub
End Class
Before you create the setup project for the SampleWordAddin add-in, first build the project so the project output is available for the setup project. Building the add-in generates the deployment and application manifests required for the deployment and installation of the add-in. Also, Visual Studio provides two build configurations out of the box. You should make sure only to distribute release builds because these assemblies are optimized. Be aware that release builds might hinder debugging of your solution because of optimizations in the execution order.
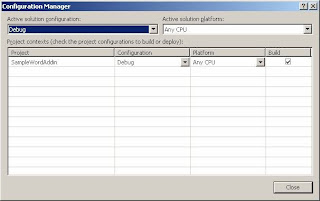
To set the build configuration to release, See Solution Explorer, right-click Solution 'SampleWordAddin' (1 project) and click Configuration Manager to show the build configuration manager for the Visual Studio solution.
Before we create the setup project for the SampleWordAddin add-in, first build the project so the project output is available for the setup project. Building the add-in generates the deployment and application manifests required for the deployment and installation of the add-in.
To build the SampleWordAddin project, Click Build menu, select Build Solution to compile the add-in. Make sure that there are no compilation errors.
2. Create Setup Project
The next step is to create setup project for deployment. To add the setup project to the Word Addin, Select File menu, expand Add and click New Project to add a new project to the "SampleWordAddin" solution.
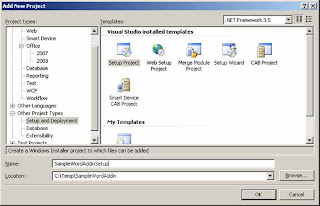
In the Add New Project dialog box, in the Project types pane, expand Other Project Types and then select Setup and Deployment.
In the Templates pane, select Setup Project from the Visual Studio installed templates group.
In the Name box, type "SampleWordAddinSetup".
Now, we need to add project output of our SampleWordAddin. In the Solution Explorer, right-click SampleWordAddin, click Add and then Project Output.
In the Add Project Output Group dialog box, confirm that the SampleWordAddin project is selected, and the Primary Output option is selected.
Click Open to add the project output to the setup project.
The setup project needs to deploy the deployment manifest and application manifest. You can add these two files to the setup project as stand-alone files from the output folder of the SampleWordAddin project.
To add the deployment and application manifests:
In the Solution Explorer, right-click SampleWordAddin, click Add, and click File.
In the Add Files dialog box, navigate to the SampleWordAddin output directory. Usually the output directory is the bin\release subfolder of the project root directory, depending on the selected build configuration.
Select the SampleWordAddin.vsto and SampleWordAddin.dll.manifest files and click OK to add these two files to the setup project
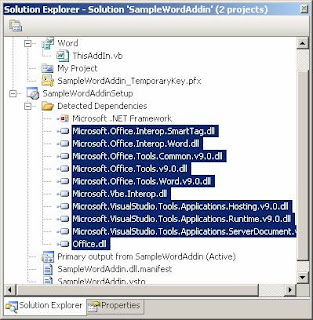
Referencing the SampleWordAddin includes all the components that SampleWordAddin requires. These components must be excluded and deployed using prerequisite packages to allow them to be registered correctly.
To exclude the SampleWordAddin project dependencies
In the Solution Explorer, in the SampleWordAddin node, select all dependency items beneath the Detected Dependencies item except for Microsoft .NET Framework.
Right-click the group and select Properties.
In the Properties window, change the Exclude property to True to exclude the dependent assemblies from the setup project.
a) Microsoft .NET Framework 3.5
b) Microsoft Visual Studio Tools for the Microsoft Office system (version 3.0 Runtime)
c) Redistributable Primary Interop Assemblies for the 2007 Microsoft Office system.
d) Windows Installer 3.1
Configure dependent components as prerequisites
In the Solution Explorer, right-click the SampleWordAddinSetup project and select Properties.
The SampleWordAddinSetup Property Pages dialog box appears.
Click Prerequisites.
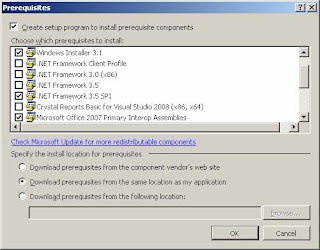
In the Prerequisites dialog box, perform the following tasks.
Select Create setup program to install prerequisite components. This creates the setup.exe bootstrapper together with the MSI file.
In the Choose prerequisites to install list, select the following:
a) Windows Installer 3.1
b) .NET Framework 3.5
c) 2007 Microsoft Office Primary Interop Assemblies
d) Visual Studio Tools for the Office system 3.0 Runtime
To specify the install location for prerequisites, select Download prerequisites from the same location as my application.
Click OK to close the Prerequisites dialog box
Click OK to close the property pages of SampleWordAddinSetup.
Microsoft Office locates the application-level add-in by using registry keys in the HKEY_CURRENT_USER hive. The Visual Studio setup project is capable of configuring the required registry keys
The keys live in a user specific key hive, which makes the add-in available only to the user running the setup. But in this walkthrough we are going to deploy the add-in to all users.
In the Solution Explorer, right-click SampleWordAddInSetup.
Expand View.
Click Registry to open the registry editor window.
In the Registry(SampleWordAddInSetup) editor, expand HKEY_CURRENT_USER and then Software.
Delete the [Manufacturer] key found under HKEY_CURRENT_USER\Software. This key is automatically added when the setup project is created and is not used by the add-in.
Expand HKEY_LOCAL_MACHINE and then Software.
Delete the [Manufacturer] key found under HKEY_ LOCAL_MACHINE\Software. This key is also added automatically and isn’t used by the add-in.
Right-click the Software key under HKEY_LOCAL_MACHINE, select New and then Key. Use the text Microsoft for the name of the new key.
Use a similar process to create the entire key hierarchy required for the add-in registration. The following key hierarchy is used for the SampleWordAddIn add-in.
HKEY_LOCAL_MACHINE\Software\Microsoft\Office\12.0\User Settings\SampleCompany.SampleWordAddIn\ Create\Software\Microsoft\Office\Word\Addins\SampleCompany.SampleWordAddIn
Also, don’t forget to set Create's key “DeleteOnUninstall” property in the Properties Window to True to make sure it is always deleted on uninstall
Now, on the SampleCompany.SampleWordAddin key, create the registry entries as follows:

The increment of this registry entry will be done using a custom action. I will be updating this section soon.
5. Trusting the Solution for All Users:
We have setup all the registry entries needed and now we need to trust the add-in. The “Inclusion List” project provided in the MS article is nothing but the creation of registry keys. This registry key resides under HKEY_CURRENT_USER\Software\Microsoft\VSTO\Security\Inclusion.
Since this key resides in HKCU hive, it is useless for All Users deployment. The setup should create the key as mentioned below in order to make this add-in available to all users.
HKLM\Software\Microsoft\Office\12.0\ User Settings\SampleCompany.SampleWordAddIn\Create\Software\ Microsoft\VSTO\Security\Inclusion
To do this change, follow the procedure given below:
Go to HKEY_CURRENT_USER\Software\Microsoft\VSTO\Security\Inclusion and find the entry in the list that pre-trusts your solution. Export this entry into a .reg file. The exported file should look like this:
Windows Registry Editor Version 5.00
[HKEY_CURRENT_USER\Software\Microsoft\VSTO\Security\Inclusion\30b8e0dd-8ff5-4828-a53b-4933424888fd]
"Url"="file:/ExcelWorkbook1.vsto"
"PublicKey"="nPAT3uo/l/ba+L74Am8cHuxNwe50oXwpVgdKyKQOjskBkZWMMb8vcFzN91NxMj3p7CehgQeGZNuuy64wmvwiFRRq20lKXca3Iv7dkWgED6rkG20EGp4je0E1LrxdwYQg5tj5OO0gn4
Now, change HKEY_CURRENT_USER to HKEY_LOCAL_MACHINE, andto [TARGETDIR], save the .reg file.
Then, go to Visual Studio deployment project, open the Registry View, right click on "Registry on Target Machine" root node in the view and click “Import” to import the .reg file.
Now the registry entries will be created under HKLM hive and should be functioning for all users.
Build the solution and try installing this to an end user machine and the add-in should be available to all users.
Additional Resources:
To configure the development computer for deploying Office 2007 solutions, see Deploying a Visual Studio Tools for the Office System 3.0 Solution for the 2007 Microsoft Office System Using Windows Installer (Part 1 of 2). This includes prerequisites to include in your Setup project.
To see examples on how to deploy Office 2007 solutions with a Setup project, Deploying a Visual Studio Tools for the Office System 3.0 Solution for the 2007 Microsoft Office System Using Windows Installer (Part 2 of 2) provides and how to combine ClickOnce and Windows Installer.
Deploying your VSTO 2008 Add-In to All Users (Part III)
http://blogs.msdn.com/mshneer/archive/2008/04/24/deploying-your-vsto-add-in-to-all-users-part-iii.aspx
It's been quite a while I am thinking about writing a blog on "VSTO 3.0 Deployment". I faced some serious problems in my inital stages of VSTO deployment as there was no clear path to all users deployment. I have to chase more than 3-4 articles/blogs to understand the concept of deploying the solution for all users. So, I thought of providing the deployment solution for all users in one single article which might be helpful for starters.
What we are going to see in this section?
1. Create a WordAddin
2. Create Setup Project
3. Configuring prerequisites
4. Configuring Registry Keys
5. Trusting solution for All Users
1. Create a WordAddin:
Open Microsoft Visual Studio 2008.
On the File menu, expand New and click Project to create a new Visual Studio project.
In the New Project dialog box, in the Project types pane, expand Visual Basic, expand Office, and then select 2007.
In the Templates pane, select Word 2007 Add-in.

In the Name box, type SampleWordAddin.
Select Create Directory for Solution, and click OK to create the new Word 2007 add-in. The Solution Explorer displays the opened solution.

If the code file for the ThisAddIn class is not currently open, in the Solution Explorer, right-click the ThisAddIn.vb file and click View code to open the main code file for the SampleWordAddin add-in.
In the code editor, locate the ThisAddIn_StartUp method. Add a call to the System.Windows.Forms.MessageBox.Show method to display a custom message when the add-in starts.
Public Class ThisAddIn
End Class
Before you create the setup project for the SampleWordAddin add-in, first build the project so the project output is available for the setup project. Building the add-in generates the deployment and application manifests required for the deployment and installation of the add-in. Also, Visual Studio provides two build configurations out of the box. You should make sure only to distribute release builds because these assemblies are optimized. Be aware that release builds might hinder debugging of your solution because of optimizations in the execution order.
To set the build configuration to release, See Solution Explorer, right-click Solution 'SampleWordAddin' (1 project) and click Configuration Manager to show the build configuration manager for the Visual Studio solution.

In the Configuration Manager dialog box, for Active Solution Configuration, select Release and Close the dialog box.
Before we create the setup project for the SampleWordAddin add-in, first build the project so the project output is available for the setup project. Building the add-in generates the deployment and application manifests required for the deployment and installation of the add-in.
To build the SampleWordAddin project, Click Build menu, select Build Solution to compile the add-in. Make sure that there are no compilation errors.
2. Create Setup Project
The next step is to create setup project for deployment. To add the setup project to the Word Addin, Select File menu, expand Add and click New Project to add a new project to the "SampleWordAddin" solution.
In the Add New Project dialog box, in the Project types pane, expand Other Project Types and then select Setup and Deployment.
In the Templates pane, select Setup Project from the Visual Studio installed templates group.
In the Name box, type "SampleWordAddinSetup".

Ensure that the folder identified by the Location box is inside the VSTO v3 Deployment Demo folder created for the solution, and click Open to create the new setup project.
Now, we need to add project output of our SampleWordAddin. In the Solution Explorer, right-click SampleWordAddin, click Add and then Project Output.
In the Add Project Output Group dialog box, confirm that the SampleWordAddin project is selected, and the Primary Output option is selected.
Click Open to add the project output to the setup project.
The setup project needs to deploy the deployment manifest and application manifest. You can add these two files to the setup project as stand-alone files from the output folder of the SampleWordAddin project.
To add the deployment and application manifests:
In the Solution Explorer, right-click SampleWordAddin, click Add, and click File.
In the Add Files dialog box, navigate to the SampleWordAddin output directory. Usually the output directory is the bin\release subfolder of the project root directory, depending on the selected build configuration.
Select the SampleWordAddin.vsto and SampleWordAddin.dll.manifest files and click OK to add these two files to the setup project
Referencing the SampleWordAddin includes all the components that SampleWordAddin requires. These components must be excluded and deployed using prerequisite packages to allow them to be registered correctly.
To exclude the SampleWordAddin project dependencies
In the Solution Explorer, in the SampleWordAddin node, select all dependency items beneath the Detected Dependencies item except for Microsoft .NET Framework.
Right-click the group and select Properties.
In the Properties window, change the Exclude property to True to exclude the dependent assemblies from the setup project.

3. Configuring prerequisites
The Windows Installer package should install the prerequisite components. The setup project can include and install the redistributables provided by the component vendors, a process called bootstrapping. For the SampleWordAddin, the following prerequisites must be installed before the add-in can run correctly.
a) Microsoft .NET Framework 3.5
b) Microsoft Visual Studio Tools for the Microsoft Office system (version 3.0 Runtime)
c) Redistributable Primary Interop Assemblies for the 2007 Microsoft Office system.
d) Windows Installer 3.1
Configure dependent components as prerequisites
In the Solution Explorer, right-click the SampleWordAddinSetup project and select Properties.
The SampleWordAddinSetup Property Pages dialog box appears.
Click Prerequisites.
In the Prerequisites dialog box, perform the following tasks.
Select Create setup program to install prerequisite components. This creates the setup.exe bootstrapper together with the MSI file.
In the Choose prerequisites to install list, select the following:
a) Windows Installer 3.1
b) .NET Framework 3.5
c) 2007 Microsoft Office Primary Interop Assemblies
d) Visual Studio Tools for the Office system 3.0 Runtime
To specify the install location for prerequisites, select Download prerequisites from the same location as my application.
Click OK to close the Prerequisites dialog box
Click OK to close the property pages of SampleWordAddinSetup.

4. Configuring registry keys
Microsoft Office locates the application-level add-in by using registry keys in the HKEY_CURRENT_USER hive. The Visual Studio setup project is capable of configuring the required registry keys
The keys live in a user specific key hive, which makes the add-in available only to the user running the setup. But in this walkthrough we are going to deploy the add-in to all users.
In the Solution Explorer, right-click SampleWordAddInSetup.
Expand View.
Click Registry to open the registry editor window.
In the Registry(SampleWordAddInSetup) editor, expand HKEY_CURRENT_USER and then Software.
Delete the [Manufacturer] key found under HKEY_CURRENT_USER\Software. This key is automatically added when the setup project is created and is not used by the add-in.
Expand HKEY_LOCAL_MACHINE and then Software.
Delete the [Manufacturer] key found under HKEY_ LOCAL_MACHINE\Software. This key is also added automatically and isn’t used by the add-in.
Right-click the Software key under HKEY_LOCAL_MACHINE, select New and then Key. Use the text Microsoft for the name of the new key.
Use a similar process to create the entire key hierarchy required for the add-in registration. The following key hierarchy is used for the SampleWordAddIn add-in.
HKEY_LOCAL_MACHINE\Software\Microsoft\Office\12.0\User Settings\SampleCompany.SampleWordAddIn\ Create\Software\Microsoft\Office\Word\Addins\SampleCompany.SampleWordAddIn
Also, don’t forget to set Create's key “DeleteOnUninstall” property in the Properties Window to True to make sure it is always deleted on uninstall
Now, on the SampleCompany.SampleWordAddin key, create the registry entries as follows:

You need to create a "Count" property under "HKEY_LOCAL_MACHINE\Software\Microsoft\Office\12.0\User Settings\SampleCompany.SampleWordAddIn". This value will be incremented on install and repair.
The increment of this registry entry will be done using a custom action. I will be updating this section soon.
5. Trusting the Solution for All Users:
We have setup all the registry entries needed and now we need to trust the add-in. The “Inclusion List” project provided in the MS article is nothing but the creation of registry keys. This registry key resides under HKEY_CURRENT_USER\Software\Microsoft\VSTO\Security\Inclusion.
Since this key resides in HKCU hive, it is useless for All Users deployment. The setup should create the key as mentioned below in order to make this add-in available to all users.
HKLM\Software\Microsoft\Office\12.0\ User Settings\SampleCompany.SampleWordAddIn\Create\Software\ Microsoft\VSTO\Security\Inclusion
To do this change, follow the procedure given below:
Go to HKEY_CURRENT_USER\Software\Microsoft\VSTO\Security\Inclusion and find the entry in the list that pre-trusts your solution. Export this entry into a .reg file. The exported file should look like this:
Windows Registry Editor Version 5.00
[HKEY_CURRENT_USER\Software\Microsoft\VSTO\Security\Inclusion\30b8e0dd-8ff5-4828-a53b-4933424888fd]
"Url"="file:
"PublicKey"="
Now, change HKEY_CURRENT_USER to HKEY_LOCAL_MACHINE, and
Then, go to Visual Studio deployment project, open the Registry View, right click on "Registry on Target Machine" root node in the view and click “Import” to import the .reg file.
Now the registry entries will be created under HKLM hive and should be functioning for all users.
Build the solution and try installing this to an end user machine and the add-in should be available to all users.
Additional Resources:
To configure the development computer for deploying Office 2007 solutions, see Deploying a Visual Studio Tools for the Office System 3.0 Solution for the 2007 Microsoft Office System Using Windows Installer (Part 1 of 2). This includes prerequisites to include in your Setup project.
To see examples on how to deploy Office 2007 solutions with a Setup project, Deploying a Visual Studio Tools for the Office System 3.0 Solution for the 2007 Microsoft Office System Using Windows Installer (Part 2 of 2) provides and how to combine ClickOnce and Windows Installer.
Deploying your VSTO 2008 Add-In to All Users (Part III)
http://blogs.msdn.com/mshneer/archive/2008/04/24/deploying-your-vsto-add-in-to-all-users-part-iii.aspx
Tuesday, December 30, 2008
Excel Shortcut for VSTO SE Addin
I found it difficult to assign a shortcut key for VSTO SE Excel addin while I am working on my first project in VSTO. Then I got help from msdn forum and Zi Zhou - MSFT helped me to figure out the below described solution. Thanks a ton to him as it saved a lot of my time.
To assign shortcut key for VSTO SE addin from Excel 2007 is not possible and we have do some workaround to fix this. I am not sure about the VSTO v3 but for VSTO SE we have to follow the below given procedure.
We can’t get the button’s handle created from ribbon.xml file from VBA. We need to expose this COM addin to let VBA call the function. Let’s see how we can do this in the following steps:
Step 1: Create an Excel Addin named ExcelAddin using VSTO SE and Excel 2007.
Step 2: Add a ribbon support to the project and keep the default name (ribbon.xml)
Step 3: Ribbon call back would be something like this
Public Sub MyModule(ByVal control As Office.IRibbonControl)
Select Case control.Id
Case "BlueUL"
Globals.ThisAddIn._addinUtilities.BlueUL()
Case “SetPrintArea”
Globals.ThisAddIn._addinUtilities.SetPrintArea()
End Select
End Sub
Step 4: Add Interface to the project - Right Click on the Project --> Click Add New item --> Select “Interface” from the available templates and name it as “ExcelAddinInterface” and add the below code block.
Imports System.Runtime.InteropServices
<ComVisible(True)> _
<Guid("85B3534B-DD1A-4f07-B604-4EE610453F78")> _
<InterfaceType(ComInterfaceType.InterfaceIsDual)> _
Public Interface ExcelAddInterface
Sub BlueUL()
Sub SetPrintArea()
End Interface
Step 5: Add a class to the project – Right Click on the Project --> Click Add New item --> Select “Class” from the available templates and name it as “ExcelAddinClass” and add the below code block
Imports System.Runtime.InteropServices
Imports Microsoft.Win32
Imports Microsoft.VisualBasic
<ComVisible(True)> _
<ClassInterface(ClassInterfaceType.None)> _
Public Class LazAddinClass
Implements LazAddinInterface
Public Sub BlueUL() Implements LazAddinInterface.BlueUL
On Error Resume Next
With Globals.ThisAddIn.Application.Selection.
_Borders(Excel.XlBordersIndex.xlEdgeBottom)
.LineStyle = Excel.XlLineStyle.xlContinuous
.Weight = Excel.XlBorderWeight.xlThin
.ColorIndex = 7
End With
End Sub
Public Sub SetPrintArea() Implements LazAddinInterface.SetPrintArea
Dim res As String
res = MsgBox("Are you sure to reformat the print area?",
MsgBoxStyle.YesNo)
If res = vbYes Then
Globals.ThisAddIn.Application.ActiveSheet.PageSetup. _
PrintArea = Globals.ThisAddIn.Application.Selection.Address
End If
End Sub
End Class
Step 6: In ExcelAddinClass we need to override the RequestComAutomationService() to return a new instance of the class we created above and make the field public, which makes the call in Step 3 can be compiled.
Public _addinUtilities As LazAddinClass
Protected Overrides Function RequestComAddInAutomationService() As Object
If (_addinUtilities Is Nothing) Then
_addinUtilities = New LazAddinClass
End If
Return _addinUtilities
End Function
We are done with the VSTO part and we have to create an Excel Addin to expose this procedure.
Step 7: Open Excel, Click Developer Tab --> Code Group --> Visual Basic. In Visual Basic editor, add a module and add the below code block
Dim addin As Office.COMAddIn
Dim automationObject As Object
Sub BlueUL()
Set addin = Application.COMAddIns("ExcelAddin")
Set automationObject = addin.Object
automationObject.BlueUL
End Sub
Sub SetPrintArea()
Set addin = Application.COMAddIns("ExcelAddin")
Set automationObject = addin.Object
automationObject.SetPrintArea
End Sub
Sub Auto_Open()
Application.OnKey "+^{F3}", "BlueUL"
Application.OnKey "+^{F4}", "SetPrintArea"
End Sub
Save the workbook as an Addin (“ExcelShortcut.xlam”)
Step 8: Click Office button --> Excel Options --> Add-ins tab, Choose Excel Add-ins, click Browse and select “ExcelShortcut.xlam” file and click OK
Step 9: Now goto VSTO addin, compile and run the project. Press “Ctrl+Shift+F3”. The bottom of the selected cells will be changed to pink color
Please let me know if you face any difficulty in this process.
Monday, December 22, 2008
Reading XML from VBA
I have faced with this problem (reading XML file from VBA and populate these values in a PowerPoint 2000 template) for quite sometime and I thought it is not possible to read XML file from Office 2000 (which later I came to know is possible). Also, I didn’t read much of the article, as I know we can open XML file in Excel 2003. So I made up myself to read this XML file via Excel and then populate these values in PowerPoint, which I successfully did.
But later I found we can add an XML reference and can read the XML file easily from Word, Excel or PowerPoint. So here I am providing an example on how to read XML file from PowerPoint.
Our XML file has the below structure. If you want to test it, copy the Code below and save it as "Employee.XML"
Employee.XML
<?xml version="1.0" encoding="UTF-8" standalone="yes"?>
<EmpDetails>
<Employee>
<Name>ABC</Name>
<Dept>IT-Software</Dept>
<Location>New Delhi</Location>
</Employee>
<Employee>
<Name>XYZ</Name>
<Dept>IT-Software</Dept>
<Location>Chennai</Location>
</Employee>
<Employee>
<Name>IJK</Name>
<Dept>HR Operations</Dept>
<Location>Bangalore</Location>
</Employee>
</EmpDetails>
Open up VBA editor in PowerPoint and add references to "Microsoft XML, v3.0" (this reference is for Office 2000).
Create a new module and copy paste the following code and run it.
Below is the code to read the above XML file:
Sub XMLfromPPTExample()
Dim XDoc As MSXML2.DOMDocument
Dim xEmpDetails As MSXML2.IXMLDOMNode
Dim xEmployee As MSXML2.IXMLDOMNode
Dim xChild As MSXML2.IXMLDOMNode
Set XDoc = New MSXML2.DOMDocument
XDoc.async = False
XDoc.validateOnParse = False
XDoc.Load ("C:\Emp.xml")
Set xEmpDetails = XDoc.documentElement
Set xEmployee = xEmpDetails.firstChild
For Each xEmployee In xEmpDetails.childNodes
For Each xChild In xEmployee.childNodes
MsgBox xChild.baseName & " " & xChild.Text
Next xChild
Next xEmployee
End Sub
Tuesday, July 15, 2008
ODBC using XLODBC.XLA and ADODB in VBA
Hi,
I have been looking to connect Oracle DB to excel and found this way much eaiser to query tables, packages and procedures.
Using XLODBC.XLA
For this you need to add the "XLODBC.XLA" file to excel and add the reference of the file in VBA editor too. Usually "XLODBC.XLA" files can be found in "C:\Program files\Microsoft Office\Office\Library\Msquery".
Place the below lines of code in the VBA module.
Sub ExecutePackageFunc()
Dim Conn As Variant
'Open the connection using data source name, user id & password
Conn = SQLOpen("DSN=#####;uid=#####;pwd=#####")
'Select query
SQLExecQuery Conn, "SELECT packagename.functionname(parameter1, parameter2) from dual"
'Populate the result in excel range
SqLretrieve Conn, ActiveSheet.Range("A1"), , , True
'Close the connection
SQLClose (Conn)
End Sub
Note:
SqLretrieve Conn, ActiveSheet.Range("A1"), , , True
The above line of code will place the result set in the cell A1 with header. If you don't need the header then modify your code as below.
SqLretrieve Conn, Range("A1"), 1, 1, 0, 0, 0, 1
USING ADODB
Set VBA reference to "Microsoft ActiveX Data Objects 2.5 Library"
Sub ExecutePackageFunc()
'Declaring Connection Variables
Dim Conn As ADODB.Connection
Dim Rst As ADODB.Recordset
'Set Connection Variables
Set Conn = New ADODB.ConnectionSet
Rst = New ADODB.Recordset
'Open connectin variables
Conn.Open "DSNName", "User_ID", "Password"
Rst.ActiveConnection = Conn
Rst.CursorLocation = adUseClient
'Select data from DB and set it to the recordset
Rst.Source = "SELECT packagename.functionname(parameter1, parameter2) from dual"
Rst.Open
gFee = Rst.Fields(0) 'o is the index of the first field returned by the SQL query
Range("A1").Value = gFee
'Close recordset
Rst.Close
'Close DB connection
Conn.Close
End Sub
Subscribe to:
Posts (Atom)